PART 2: THE BATTLEFIELD
CARD DESCRIPTIONS AND DETAILS
A game of TACTICA utilizes many types of cards, but in general, they can be separated into 2 broad categories: Feature Cards and Draw Cards. In the full advanced game, there are also Summoning Cards.
Feature cards consist of double-sided landmark cards which represent high or low terrain on the battlefield, wall cards which represent a player’s ‘home base’ for the battle and dictate where troops can appear and be trained, and Pile markers (LOST and RESUPPLY) which, although optional, are very useful for keeping track of discarded or inactive Draw cards.
Draw cards involve troop cards, which represent formations of various soldiers, double-sided training cards that represent various levels of experience and equipment a soldier possesses, and tactics cards, which have several uses, most of which involve temporary improvements to troop cards but can also affect feature cards, affect enemy resources, and even fight on the battlefield.
Summoning Cards represent otherworldly forces brought into the battlefield through ritual and sacrifice. These double-sided cards contain two different summons that require very different play styles to use most effectively.
INFORMATION CARD (Side A)

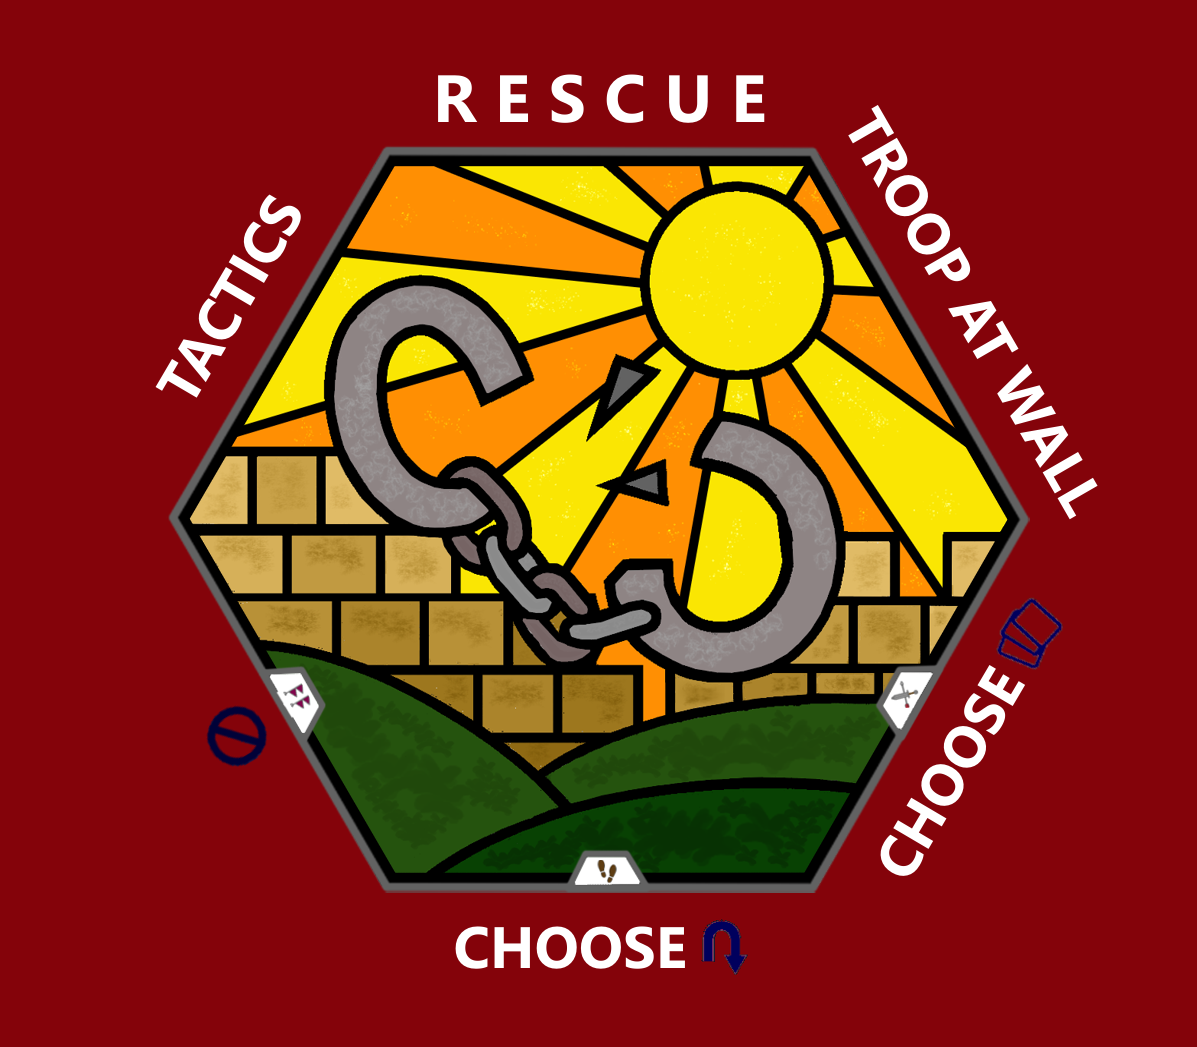
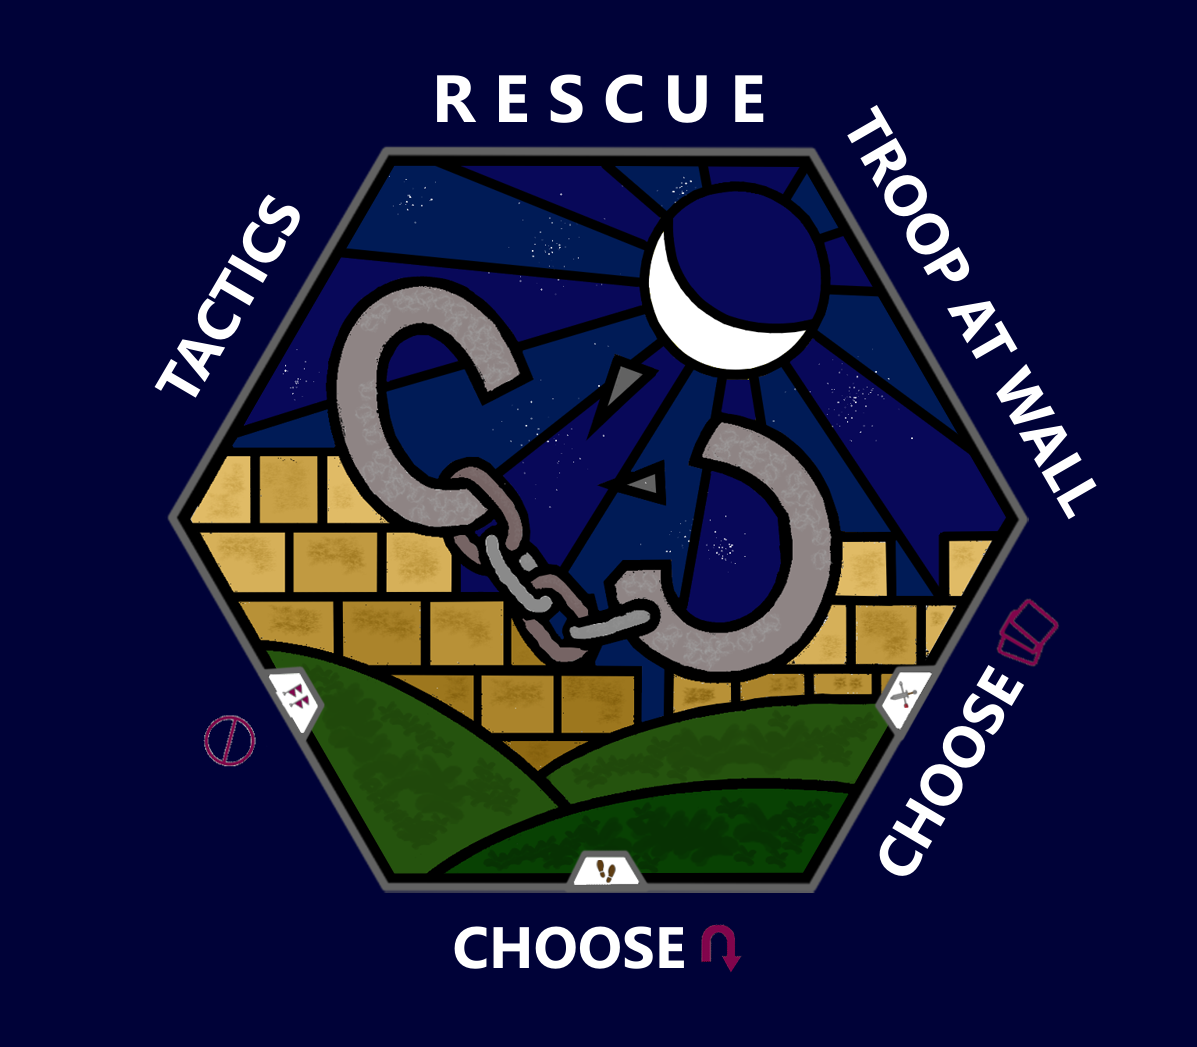
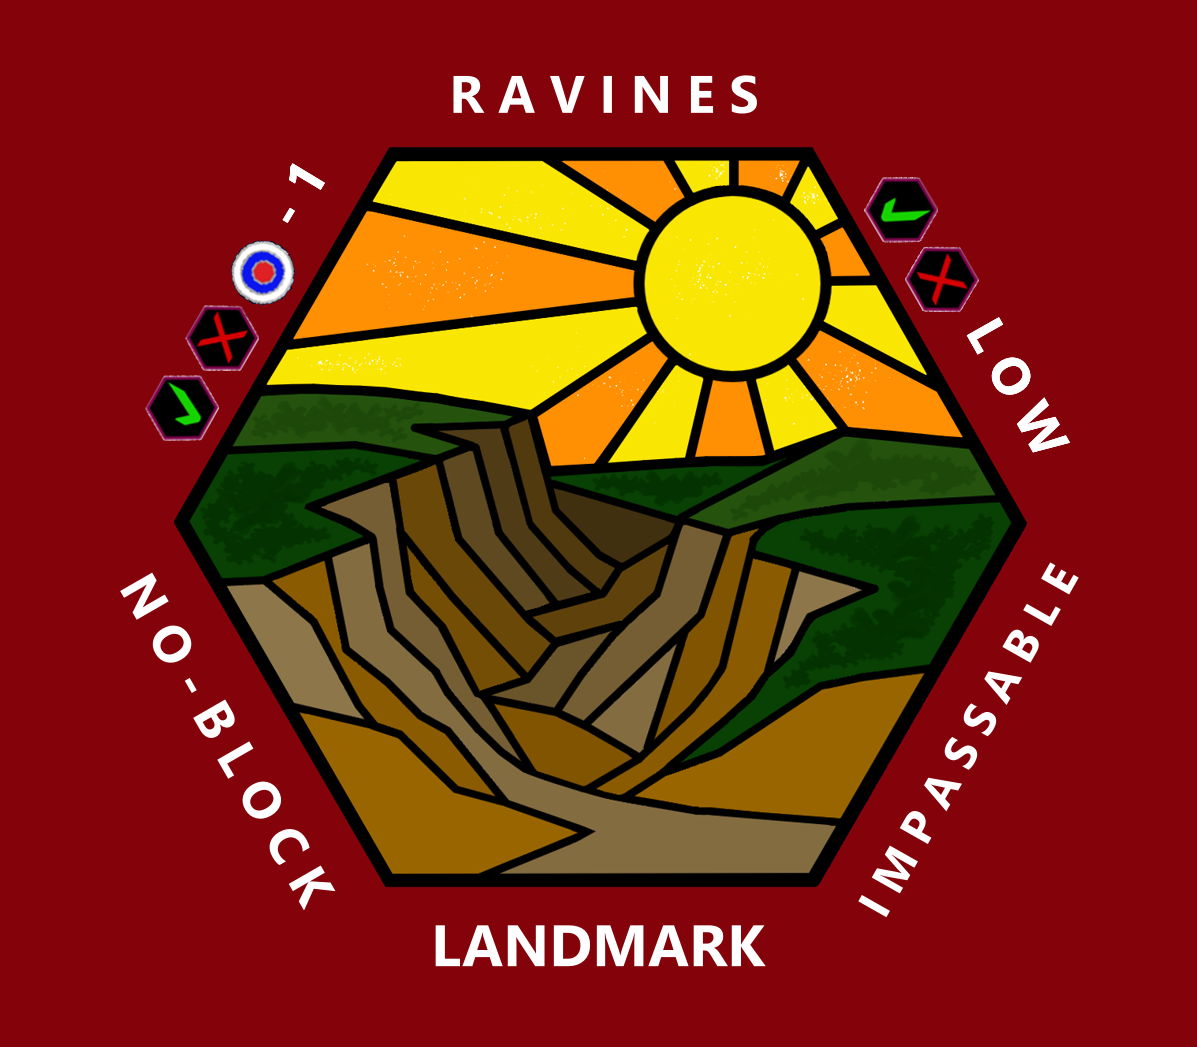
The symbol-ring that surrounds all cards is not intended to be a rule book (that is what this document is for!) but instead a quick-reference guide to help recall basic functions of the card in question. To fully utilize the card, it will be necessary to refer to the full rulebook to get details about card abilities and functions, but with just a little practice, the text ring around cards will be more than sufficient to remind you when a card is useful and what it can do!
The information card provides a key to the various symbols found in the text rings.
OFFENSE (OFF) represents the damage a troop card can deliver, or the bonus to a troop’s OFF score given by another card (such as a tactics card).
DEFENSE (DEF) represents the amount of damage a troop card can safely absorb, or the bonus to a troop’s DEF score given by another card (such as a tactics card). Remember that damage needs to exceed the DEF rating of a troop to capture it. Unless specified otherwise, if a troop is not captured during the RESOLUTION phase, all damage is removed.
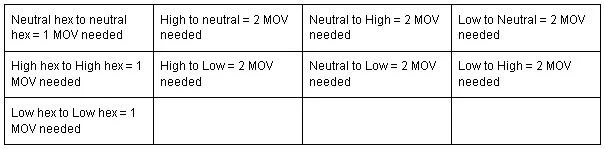
MOVEMENT (MOV) represents how many movement points a troop has, or the bonus to a troop’s MOV given by another card (such as a tactics card). It takes 1 MOV to travel 1 hex, but it takes 2 MOV to switch terrains (neutral→high, neutral→low, high→neutral, low→neutral). (See DETERMINING TERRAIN under LANDMARK CARDS).
RANGE (RNG) represents the distance (in hexes) a troop can deliver damage to a target troop card, or the bonus to a troop’s RNG by another card (such as a tactics card). An RNG of 1 means the troop can only damage 1 hex away (i.e. an adjacent card). RNG can never be dropped below 1.
SENT TO RESUPPLY: During the RESOLUTION phase, this card is sent to the RESUPPLY pile. It is out of play for the remainder of this battle, but will be returned to its appropriate pile at the start of the next battle. EXCEPTION: For Decrees (Advanced Game), this card is immediately sent to the RESUPPLY pile.
SENT TO LOST: During the RESOLUTION phase, this card is sent to the LOST pile. It is out of the play for the remainder of the war (cannot be used for all subsequent battles of this game). EXCEPTION: For Decrees (Advanced Game), this card is immediately sent to the LOST pile.
ADJACENT FRIENDLIES: This symbol is contextual but generally means that the bonus or ability will affect itself and all adjacent friendly cards, or that the troop card needs to be adjacent to a target to activate. It is recommended to check with the rulebook to clarify specifics until you are comfortable with the card.
ADJACENT ENEMIES: This symbol is contextual but generally means that the bonus or ability will affect all adjacent enemy cards, or that the troop card needs to be adjacent to the target to activate. It is recommended to check with the rulebook to clarify specifics until you are comfortable with the card.
RETURN TO PILE AND RESHUFFLE: This symbol shows that the card is immediately returned to its origin pile (troop cards turn to the troop pile, and tactics cards return to the tactics pile), and each pile is immediately reshuffled.
RETURN TO BARRACKS: During the RESOLUTION phase, this card is returned to its owner’s BARRACKS, and can be reused on the following turn.
MOVEMENT PHASE: Any ability adjacent to this symbol may be used during the MOVEMENT PHASE.
COMBAT PHASE: Any ability adjacent to this symbol may be used during the COMBAT PHASE.
MUSTER PHASE: Any ability adjacent to this symbol may be used during the MUSTERING PHASE.
DECREE CARD (Side B) (for advanced game only)
TROOP CARDS
Troop cards represent armed forces. Each of these cards has 4 ratings (offense, range, defense, speed).
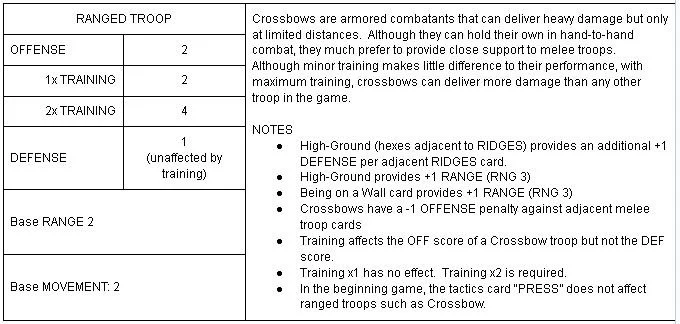
Offense (OFF) is the amount of damage brought to bear against a chosen enemy. Ranged troops gain extra offense as a result of training. (see TRAINING)
Range (RNG) is the number of hexes away this damage can be delivered (range 1 = adjacent hex). Range can be affected by features on the battlefield. (see WALL and LANDMARKS)
Defense (DEF) is the number of damage that must be exceeded in a single turn to capture an enemy card. Melee troops gain extra defense as a result of training. (see TRAINING)
Move (MOV) is the number of movement points possessed in a single turn. In most cases, moving one hex on the battlefield requires one movement point, but moving from one feature to another requires two. (see WALL and LANDMARKS)
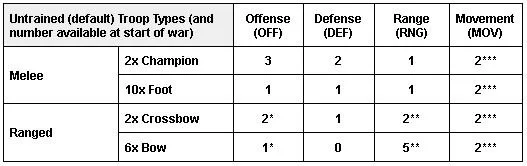
* Ranged cards attacking adjacent melee troops suffer -1 OFF.
**Ranged troops on High-Ground gain +1 RNG and on Low-Ground suffer -1 RNG
**The horse tactics card may extend effective movement by up to +2 MOV
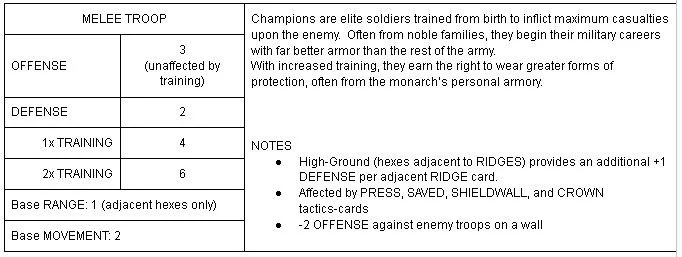
CHAMPION


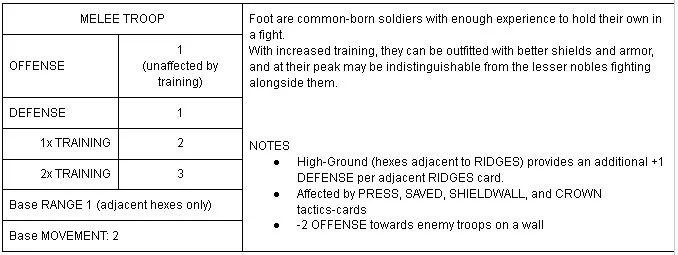
FOOT


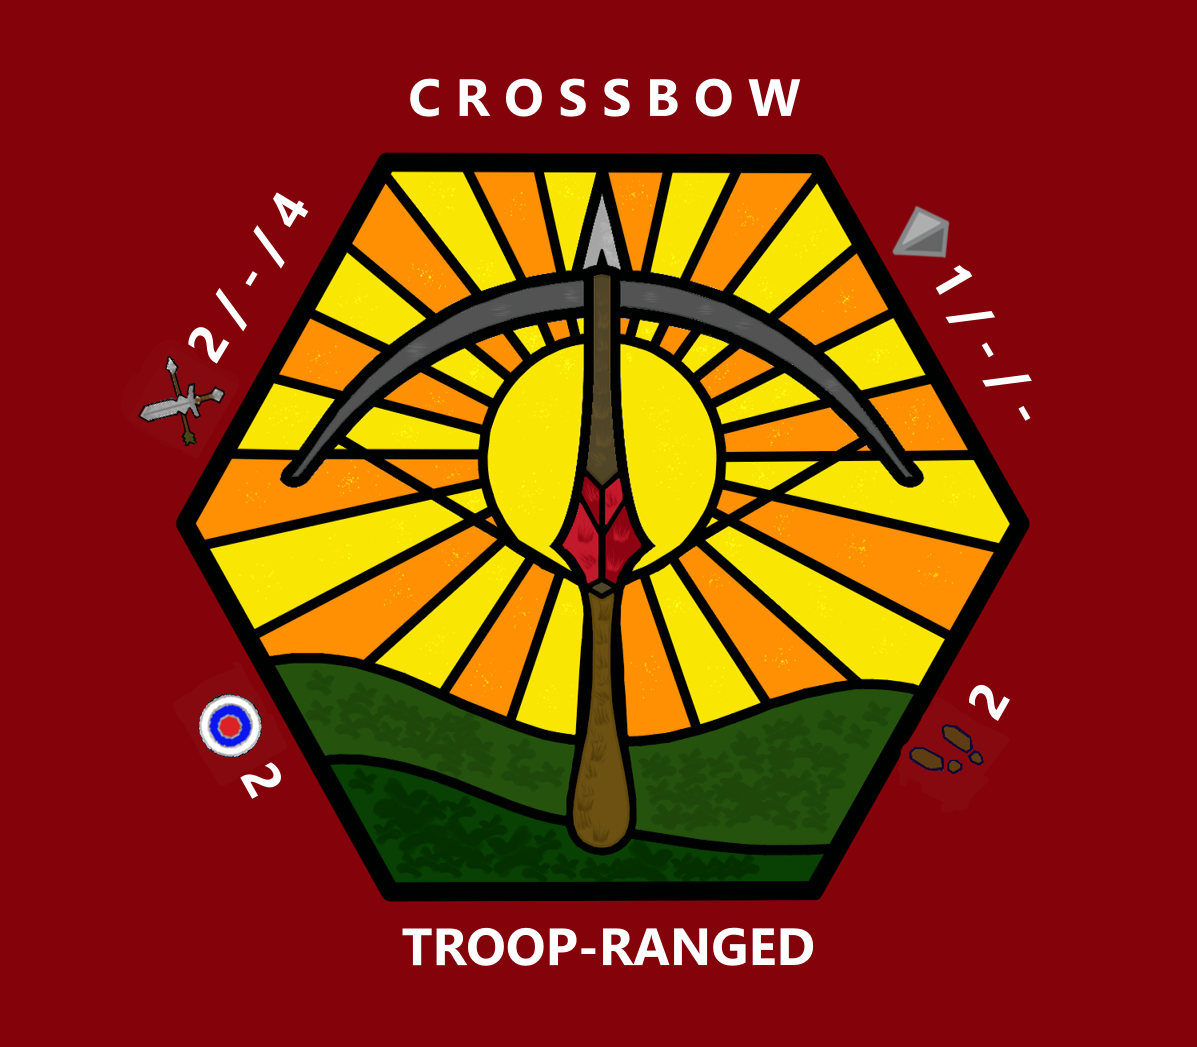
CROSSBOW

ARCHER


TRAINING CARDS
There are 10 double-sided training cards that can be individually placed under troop cards to represent advanced experience, equipment, etc. The level the troop is advanced depends on what type of troop (Melee or Ranged) and the side of the training card that is face-up (1x or 2x).
In the basic game, training cards can only be placed under a troop card if it is adjacent to a friendly wall card. It takes one mustering action to place a training card at 1x, and a second mustering action to flip a 1x training card to the 2x side.
The player who is training the troop is required to announce clearly which troop is being trained and to what level (1x or 2x) it is being raised to. The player is not required to remind their opponent(s) about this level of training, nor which troop has been trained, after this point. It is the opponent’s responsibility to remember it!
Exception. If the troop’s owner forgets the level of training of their own troop card, and they look at the stacked card to verify, they then are once again required to also remind their opponent(s) of the training on that particular card. In other words, it is also YOUR responsibility to remember the level of training of each of your troops!
When a trained troop is captured, the training card under the troop is immediately sent to its owner’s LOST pile before the troop itself is sent to the capturer’s hostage pile. If the troop is rescued thereafter, its training is not returned.
TRAINING x1 (Side A)


The first muster action used for training purposes results in this card being placed face-up under the troop being trained. It does affect different types of troops differently, however.
MELEE troops: TRAININGx1 doubles their DEF score
Champion: 2→4
Foot: 1→2
RANGE troops: TRAININGx1 has no effect on ranged troops. NOTE: Ranged troops still need to be trained at the 1x level before they can be trained to the 2x level.
TRAINING x2 (Side B)


It requires a second muster action to flip the TRAININGx1 card to the TRAININGx2 side. As with the 1x side, the 2x side affects different types of troops differently.
MELEE troops: TRAININGx2 triples their base DEF score
Champion: 2→6
Foot: 1→3
RANGE troops: TRAININGx2 doubles their base OFF score
Crossbow: 2→4
Archer: 1→2
TACTICS CARDS
CROWN


CROWN is a unique tactics card for it is the only tactics can act as a troop card. When played in any phase, it replaces a melee card that is already on the battlefield. Once CROWN replaces another melee card, it ceases to become a tactics card and becomes a melee card in every way (affected by anything that would normally affect a melee card, etc).
The CROWN has the following statistics when deployed:
OFF 3
DEF 2
RNG 1
MOV 2
ALL friendly troop cards adjacent to it have +1 OFF while they maintain contact. This includes new troop cards that come in contact with CROWN for the rest of the battle. Note that this effect occurs only while it is adjacent to CROWN.
MUSTERING PHASE: As above, but CROWN cannot be negated, even when initially played.
MOVEMENT PHASE: As above, but CROWN cannot be negated, even when initially played.
COMBAT PHASE: As above, but CROWN can be negated when initially played (but not after it is on the field).
IMPORTANT NOTE: Use CROWN wisely. If the CROWN is captured, the owner of the card (not the player who did the capturing) must perform a RANSOM ACTION each RESOLUTION (starting the following turn. A ransom action is defined as:
Return one card from their hostage pile to the card owner’s RESUPPLY pile.
If, during RESOLUTION, a player has no hostages to ransom, they cannot use any tactics card (either during their turn or as a counter to another card being played) until they once again have hostages to transfer.
The above effects continue until the CROWN is rescued, or the battle is won by other means.
If a battle ends with the CROWN still in a hostage pile, the capturing player immediately becomes the victor of the entire WAR (game ends).
DISENGAGE


THIS IS A COUNTER-CARD and may be played after an opponent plays a card during their turn.
MUSTERING PHASE: There is no application for Disengage during this phase.
MOVEMENT PHASE: Allows a troop card to use movement points if locked by adjacent opposing troops.
NOTE: Under normal rules, a troop card cannot move if adjacent to an opposing troop card.
Disengage card sent to RESUPPLY in RESOLUTION.
COMBAT PHASE: Card gains +1 DEF, but must have a free hex to move into that is not adjacent to an enemy troop card.
NOTE: If the target card survives combat, it must move to this hex.
Disengage card returned to BARRACKS in RESOLUTION if 1 MOV is required, and sent to RESUPPLY if 2 MOV is required (terrain, wall, etc)
ENGINEER


MUSTERING PHASE: There is no application for the Engineer card during this phase.
MOVEMENT PHASE: When played on a troop card, the troop may ignore Landmark or Wall movement penalties (i.e. may enter or leave terrain with only 1 MOV. May enter or leave a friendly wall hex with only 1 MOV.
NOTE that this does not allow friendly troops to “climb” enemy walls.
Engineer card returned to BARRACKS in RESOLUTION.
COMBAT PHASE: A single battleground feature (landmark card, wall card, or spire card (in the advanced game) can be removed from the battle (and the war!). Target card goes to the owner’s LOST pile. Any bonuses and/or penalties immediately vanish with respect to combat resolution.
Engineer card sent to RESUPPLY in RESOLUTION.
HORSE


MUSTERING PHASE: There is no application for the Horse card during this phase.
MOVEMENT PHASE: Must be played before any movement. Gives troop 2 MOV. Note that playing horse on a Troop card will also affect all cards adjacent to that card (all the cards gain 2 MOV) but this movement must end with all cards still adjacent to the originally targeted card.
This movement counts as the 1st card move (out of 3). Affected individual cards can still be used for the 2nd and 3rd card move action. REMEMBER: Normally, a MOVEMENT PHASE allows a player to move up to 3 cards up to 2 hexes each. Playing a HORSE card provides a bonus 2 MOV to any card affected by the tactics cards. After HORSE is played, these cards can still gain their allowed 2 MOV. The HORSE card merely acts as the “first card move” of their allowed 3.
Example 1: Player 2 plays HORSE on a Champion card and moves the Champion 2 hexes. For their 2nd card move, they could still move the same Champion another 2 hexes.
Example 2: Player 1 plays HORSE on a Foot card that is touching two other troop cards. The player decides to move ALL THREE cards 2 hexes, making sure that the final positions still have the 2 other cards adjacent to the original Foot card. For the 2nd move action, they could (if desired) move any one of these cards 2 more hexes, and for their 3rd move action, could move another of these cards 2 more hexes.
Horse card returned to BARRACKS in RESOLUTION.
COMBAT PHASE: Can only be played on Melee cards. Melee card gains +1 OFFENSE for an attack.
Horse card LOST in RESOLUTION.
NEGATE


THIS IS A COUNTER-CARD and may be played after an opponent plays a card during their turn.
ALL PHASES: When an opponent plays a tactics card, you can counter with this card to remove it from the battle.
Both Negate card and the target Tactics card are sent to their respective player’s RESUPPLY deck.
If TWO negate cards are simultaneously played together to counter the same opposing card (this is the only card that can be played two-at-a-time as the same counter), one Negate card is sent to RESUPPLY, and both the second Negate card and the target opposing Tactics card are sent to LOST.
PRESS


THIS IS A COUNTER-CARD and may be played after an opponent plays a card during their turn.
MUSTERING PHASE: Two levels of training (untrained → 2x Training) may be given to the same troop card in the same mustering action.
Press card LOST in RESOLUTION.
MOVEMENT PHASE: A movement action may be used to move a friendly troop onto an opposing wall card for 2 MOV.
NOTE that Press is not required to exit an enemy wall card, but still requires 2 MOV.
Press card sent to RESUPPLY in RESOLUTION.
COMBAT PHASE: In the basic game, the affected troop card gains +1 OFF when attacking an adjacent enemy troop card. In the advanced game, the affected troop card gains a bonus to OFF equal to 1 + training level (e.g. 2x training on Foot = +3 OFF). In the advanced game, this card also applies to ranged troops, which may offset negatives against adjacent melee troops.
Press card returned to BARRACKS in RESOLUTION.
RESCUE
MUSTERING PHASE: There is no application for Rescue in this phase
MOVEMENT PHASE: When a friendly troop card is adjacent to an enemy Wall, the player may choose which troop from the enemy hostage pile is rescued.
NOTE: A player does not need a Rescue Tactics card to attempt a rescue, but without this card, the card “rescued” is random from the opponent’s hostage pile.
Champions (and CROWN) who are rescued must appear both adjacent to the rescuing card and an opponent’s Wall card and may participate in the following COMBAT PHASE. All other troop cards (Foot, Archer, Crossbow) are sent to their owner’s RESUPPLY pile.
Rescue card is sent to RESUPPLY in RESOLUTION.
COMBAT PHASE: When a friendly troop card is adjacent to an enemy Wall, the player may choose which troop from the enemy hostage pile is rescued.
NOTE: A player does not need a Rescue Tactics card to attempt a rescue, but without this card, the card “rescued” is random from the opponent’s hostage pile.
Champions (and CROWN) who are rescued must appear both adjacent to the rescuing card and an opponent’s Wall card and cannot participate in the current COMBAT PHASE.
All other troop cards are sent to their owner’s RESUPPLY pile.
Rescue Card returned to BARRACKS during RESOLUTION.
SAVED


THIS IS A COUNTER-CARD and may be played after an opponent plays a card during their turn.
MUSTERING PHASE: There is no application for Saved during this phase.
MOVEMENT PHASE: After all cards have completed movement, a melee card may switch positions with an adjacent melee troop card.
Saved Card returned to BARRACKS in RESOLUTION
COMBAT PHASE: May be played only on melee troops, which gains +1 DEF for each adjacent melee troop card..
Example: This card is adjacent to 1 untrained Foot (1), one 1x trained foot (1), and two 2x trained Foot (2). Card enjoys a +4 DEF
If this troop survives combat, swap the positions of this troop and one “defending” troop.
If the affected troop is captured, one defending trained troop is also captured.
Saved card sent to RESUPPLY in RESOLUTION.
SHIELDWALL


THIS IS A COUNTER-CARD and may be played after an opponent plays a card during their turn.
MUSTERING PHASE: There is no application for Shieldwall during this phase
MOVEMENT PHASE: This card is played on a Foot troop card. It and every Melee (including Champion) card currently adjacent to this card may switch locations as desired.
NOTE: Although it may affect Champion cards, it mustbe placed on Foot cards only.
Shieldwall card is returned to BARRACKS in RESOLUTION
COMBAT PHASE: This card is played on a Foot troop card. It and every Foot card currently adjacent to this card gains +2 DEF for this combat phase.
NOTE that this effect only applies to Foot cards.
Shieldwall card sent to RESUPPLY in RESOLUTION.
SPY


MUSTERING PHASE: Spy may ask to know the contents of the opponent’s BARRACKS and an accurate count of all opposing troop cards' training levels.
Spy card returned to BARRACKS in RESOLUTION.
MOVEMENT PHASE: Player may go through their troop and tactics deck and place a desired card at the top of each one.
Spy card sent to LOST in RESOLUTION..
COMBAT PHASE: Player may force opponent to pick a card from their barracks and return it to its original pile. The opponent then must shuffle both the troop pile and the tactics pile.
Spy card sent to RESUPPLY in RESOLUTION.
FEATURE CARDS
WALL CARD


Wall cards represent your force's base of operations and command structure, in addition to any physical defenses they would have in play. In standard (non-variant) games, each player starts with 5 wall cards and begins play in the following configuration:
NOTE that if using a battle board or battle mat, these locations are marked based on which stage of the war you are playing (battle 1, 2, or 3).
In battle 1, Player 1's wall cards should have 9 hexes separating them from Player 2.
In battle 2, Player 1's wall cards should have 7 hexes separating them from Player 2.
In battle 3, Player 1's wall cards should have 5 hexes separating them from Player 2.
Victory Condition: If a player loses all of their wall cards, they immediately lose the entire war (even if cards were lost in battle 1 or battle 2). Wall cards can only be destroyed by the appropriate use of the Engineer card or the Cthon summon card.
Wall cards have the following attributes
Mustering phase:
Melee troop cards can only muster adjacent to a friendly wall card.
Ranged troop cards can only muster adjacent to, or stacked on top of, a friendly wall card.
Training can only be done on troop cards that are adjacent to or on top of a friendly wall card. (Exception: PROMOTION decree in the advanced game.)
Movement phase:
Moving onto or off of a friendly wall card requires 2 MOV.
Troops cannot move onto an enemy wall card without use of the PRESS tactics card.
Combat phase:
All ranged troops gain a +1 RNG bonus if on top of a wall card (friendly or enemy).
In addition, if a player has lost 1 battle, all wall card locations and those hexes adjacent to, and on top of, a wall card locations give their own troops +1 DEF. If a player has lost 2 battles, these hexes provide their own troops +1 DEF and +1 OFF.
Melee troops attacking a troop on a wall card suffer a -2 OFF for that attack. Ranged troops suffer no penalties.
IMPORTANT NOTE: If a player has lost a single previous battle, all friendly wall cards, including the hexes adjacent to a friendly wall card, provide +1 DEF to friendly troops. If a player has lost two previous battles in this war, all friendly wall cards, including the hexes adjacent to a friendly wall card, provide +1 DEF and +1 OFF to friendly troops.
LANDMARKS
Landmark cards represent key features of the battlefield, and have two sides: RIDGE, and RAVINE. Landmark cards are impassable by all melee troops, and also Ouran and Cthon in the advanced game.
Hexes adjacent to a landmark card are called terrain hexes. Moving from one terrain type to another requires 2 MOV (instead of the usual 1 MOV per hex traveled). See “Determining Terrain”, below.
Optional Victory Condition: In the Advanced Game, controlling a Landmark card is worth 1 victory point (see Part 4: The Advanced Game). Controlling a Landmark card means having at least 1 friendly troop adjacent to a landmark card and no enemy troops adjacent to the same landmark card. Multiple friendly troops adjacent to the same landmark card do not increase the number of victory points.

RIDGE

In addition to Movement penalties, Ridges provide 3 effects to the battleground:
Terrain (adjacent hexes) surrounding a Ridge is considered HIGH-GROUND. High ground provides a +1 DEF to any troop. This is non-cumulative (if a troop is adjacent to multiple Ridge cards, they still only enjoy a +1 DEF).
High ground gives a +1 RNG to any ranged troop cards (not melee cards!). This is non-cumulative (e.g. if a ranged troop card is adjacent to two different ridge cards, they still only enjoy a +1 RNG).
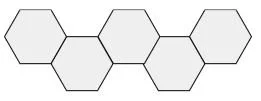
Ridge cards themselves provide cover against attacks from ranged troops. Please see the following diagram:
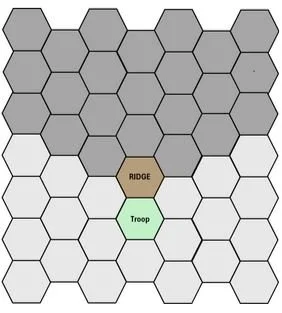
Troops (green hex) adjacent to a RIDGE (brown hex) are protected from any ranged troop attack originating from any of the dark grey hexes.
This is a partial diagram. The dark cone projects “to infinity” from each of the three hex-faces opposite the shielded troop.
Note that even a single hex between the protected troop and the ridge card prevents any shielding and can be attacked as normal.
Ranged troops adjacent to a RIDGE are prevented from attacking any target troop in the dark cone.
Note that even a single hex between the ranged troop card and the ridge card allows it to attack any other troop as normal.
RAVINE
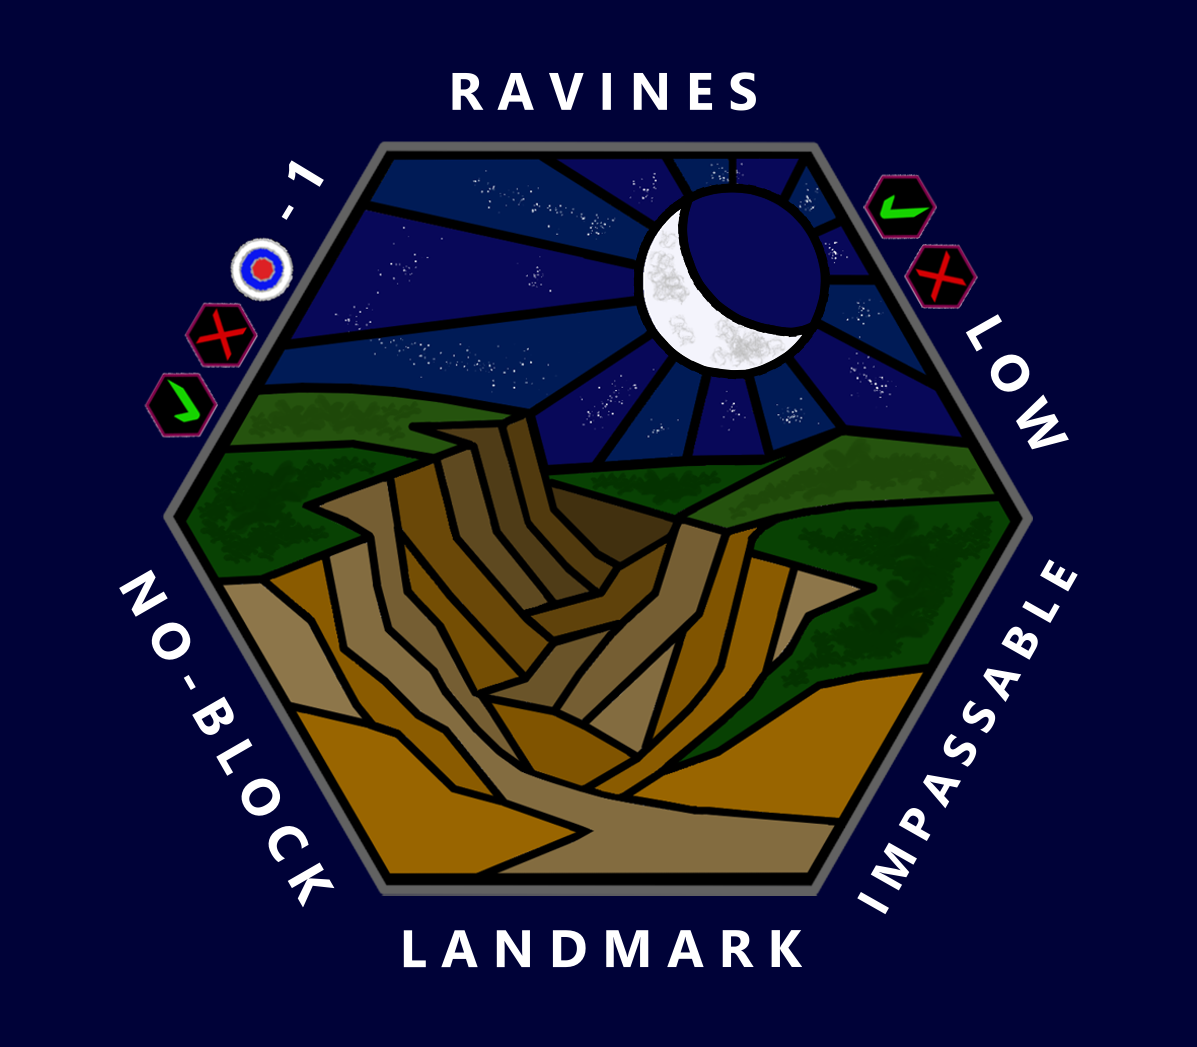
As opposed to RIDGES, other than movement penalties, RAVINES provide only 1 effect to the battleground:
Terrain surrounding a Ravine is considered LOW-GROUND. Low ground causes any ranged troop to suffer a -1 RNG penalty. This is non-cumulative (a ranged troop adjacent to multiple Ravine cards still only suffers a -1 RNG penalty).
DETERMINING TERRAIN
Determining terrain and the requisite MOV requirement is quite simple.
1) If a hex is not adjacent to a ridge or a ravine card it is flat/neutral terrain.
2) If a hex is adjacent to both a ridge and a ravine card, it is flat/neutral terrain.
3) If a hex is adjacent to a ridge card but not a ravine card it is high terrain.
4) If a hex is adjacent to a ravine card but not a ridge card it is low terrain.
Moving from one terrain type to another requires an additional 1 MOV.
Example (as can be seen by the following table) : A troop moving from neutral to high terrain would require a total of 2 MOV (1 for the standard hex to hex movement, and one extra for switching terrains)
SUMMONING CARDS
CTHON


This card is not used in the beginning game.
See SUMMON, under advanced game: Part 3: Advanced Game (Decrees)
OURAN


This card is not used in the beginning game.
See SUMMON, under advanced game: Part 3: Advanced Game (Decrees)